Thursday, August 30, 2012

Homemade Pizza


Pizza is probably my favorite thing to eat.  The gooey cheesy goodness cannot be replaced!  My favorite pizza establishment is within walking distance from our house, but sometimes I like to make pizza at home.  When I first started making pizza, I purchased the crust, sauce, cheese and pepperoni, put it together and popped it in the oven.  Overtime, I have become increasingly interested in making it from scratch.  First, I started buying crushed tomatoes and pesto and mixing my own sauce.  Then I began searching for a recipe to make the crust from scratch.  Now I make the crust from scratch and make the sauce using fresh tomatoes. I buy fresh mozzarella (rather than shredded).  I still buy cheap turkey pepperoni (I'm not quite at the point of making pepperoni, but I have been reading about making mozzarella cheese).


All of my favorite kitchen contraptions are shown in these photos.  I love my KitchenAid mixer and my Breville Blender.  That cheese slicer is amazing (especially for slicing soft cheeses like mozzarella).

This dough comes out kind of thick.  I like it, but Gabe really prefers thin crust so I think I'll be experimenting with thin crust soon.  Thin crust would definitely be less filling!

Crusty Pizza Dough (KitchenAid) 

Ingredients:
1 package active fry yeast
1 cup warm water (105-115 degrees F)
1/2 teaspoon salt
2 teaspoons olive oil
2 1/2 to 3 1/2 cups all-purpose flour
1 tablespoon cornmeal (optional for rolling out the dough)

Dissolve yeast in warm water in warmed mixer bowl.  Add salt, olive oil, and 2 1/2 cups of flour.  Attach bowl and dough hook to mixer.  Turn to low speed (2 on KitchenAid) and mix about one minute.

Continuing at low speed, add remaining flour 1/2 cup at a time, and mix until dough clings to hook and cleans sides of bowl, about 2 minutes (You may not need the entire 3 1/2 cups of flour.  If the dough isn't clinging after several minutes, try adding a little bit of water - a little bit like a tablespoon).  Knead on low speed for about 2 minutes longer.

Place dough in greased bowl, turning to grease top (I spray cooking spray into the bowl and roll my dough around in the bowl).  Cover (I use tightly wrapped aluminum foil).  Let rise in warm place, free from draft, about 1 hour, or until doubled in bulk (I place the dough in the cool oven to rise).  Punch dough down.

Brush 14-inch pizza pan with oil.  Sprinkle with cornmeal (if your pizza pan has holes like mine, you will want to skip the oil and cornmeal).  Press dough across bottom of pan, forming a collar around edge to hold toppings.  Add toppings as desired.  Bake at 450 degrees F for 15-20 minutes.

Pizza Sauce

4 premium tomatoes
salt
pepper
garlic powder
onion powder
Italian spices
1/2 sweet onion (diced)
olive oil

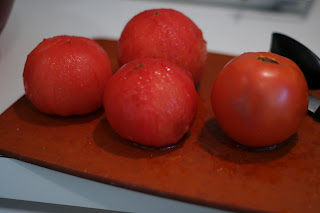
Peel and seed the tomatoes.  I used the same peeling method that I used for the spaghetti sauce (put in boiling water for 1 minute, remove and place in ice bath for about 1 minute, peel), and it worked much better with the premium tomatoes

Heat in oil in pot.  Add onions and cook until clear.  Put the tomatoes and spices (spice to taste) in a blender (or food processor) and give them a rough chop.  Once the onions are clear, add the tomatoes.  Bring to simmer and then cook for 1-2 hours (longer cooking time will make the sauce thicker and decrease the amount of water).

If you have questions, leave a comment!  If you try it, let me know how it worked out :)
 

Thursday, August 23, 2012

Fried Yucca Fanatic


My husband and I were in the produce department the other day looking for veggies for veggie dinner night.  I don't really like veggies, but Gabe loves them!  As we were looking at the sweet potatoes, we noticed the yucca and thought it would be interesting to try it.

Tonight was veggie night so at the last minute, I decided to look up yucca recipes online.  The first recipe I stumbled upon was for fried yucca on Andrew Cordova's Blog.  It looked super simple so we decided to try it, hoping for the best, but with low expectations.  This fried yucca was amazing!

Check out Andrew's blog because he has a lot more knowledge about yucca than I do, but basically, you cut it, boil it and fry it in a pan.

Gabe liked it so much that he was eating it after boiling but before frying.  We didn't even add seasoning!  Really, it was pretty simple!

Homemade Spaghetti Sauce


In an effort to cut excessive sodium and preservatives out of my diet, I have been trying to learn how to make spaghetti sauce from fresh tomatoes for a while.  But, I really had trouble finding recipes that used fresh tomatoes rather than canned tomatoes so in the meantime, I tried several of my own ideas.  What I ended up with tasted good and went well with noodles and cheese, but wasn't really marinara/spaghetti sauce.  A few days ago, my husband and I were on our way to the grocery store when he told me that he wanted spaghetti.  It seemed like the perfect opportunity to try again.   I quickly got onto Pinterest and searched for "Marinara Sauce."  I found one that sufficed from Former Chef and bought lots of tomatoes (though not nearly as many as the recipe calls for)!

That particular recipe would have made way to much for my husband and I so I modified it a bit (for the amount and for my tastes).


Peeling Tomatoes

I also found another blog via Pinterest that explained an "easy" method for peeling tomatoes.  After doing it, I'm not sure I would call it "easy," but it was better than peeling them with a knife.  To peel the tomatoes, I set the tomatoes in a pot of boiling water (a few at a time) and left them for 1 minute.  I then transferred them to a bowl of ice water and left them for another minute or so.  Some of the tomatoes actually had a small "crack" in their skin.  Those were the easiest to peel (Photo top right - I'm not sure if you can see it but the skin just starts to open up).  For those that didn't open, I scored the tomato skin with a knife.  I learned overtime that lightly scoring all of the way around made it much easier to peel.

Note #1:  You should peel and seed the tomatoes before doing anything else.  It look longer than I expected, and I wasn't ready when it was time to add them to the sauce.

Note #2:  I just put the tomatoes in the pot in quarters, but I would suggest that you throw them in the blender or food processor for a light chop before adding them to the sauce.  I certainly will do this next time as my sauce ended up a bit chunky.

Ingredients:
1/2 sweet onion (diced)
9-10 tomatoes (peeled and seeded)
Dry Italian Herbs
Olive Oil (for cooking the onions)
Fresh Garlic (amount depends on your tastes - maybe 2 cloves) or Garlic Powder
Red Wine Vinegar (about 1/3 cup)
Butter (1 TBSP)
Milk (optional)

Heat the olive oil in the pan.  Add the diced onion to the hot oil.  Cook on medium heat until the onions are brown.  Then add the dry herbs and garlic.  Cook for about 5 minutes.  Add the red wine vinegar and cook for about two more minutes.  Add the tomatoes and bring to a simmer.  Cook for about two hours.  About 10 minutes before the sauce is finished, add the butter.  I also added a little milk at this point because my sauce was a little thick.  If you blend or dice the tomatoes before adding them to the pot, you probably won't need the milk.

I also added ground turkey that I browned in the pan with garlic powder and onion powder.

Enjoy creating fresh food!

Friday, August 3, 2012

T-shirt to Tank

Ok, I realize that tons of people have already posted about the no sew t-shirt to tank, but I'm posting anyway.  I tried it today and figure that I should share my insight (I actually did a very minor amount of sewing).

I have tons (and tons) of t-shirts that I don't wear but can't bring myself to get rid of.  I don't like to wear t-shirts to the gym.  I prefer tanks so I decided to try this viral diy project..  I chose an old "United States Olympic Snowboarding Team" shirt (No, I was not on the Olympic snowboarding team.  We don't have much - or any - snow in South Florida).  I don't have a before picture because I got a little scissor happy and forgot to take one...


I began by cutting off the sleeves, collar and the seam on the bottom of the t-shirt.  Then I used a racerback tank that I like to create a basic pattern for cutting the front and back.  To do this, I placed the tank (flat) underneath a sheet of paper and traced it.  My pattern didn't fit perfectly because the openings where the t-shirt sleeves were was much larger than the openings on my tank, but it did help me to make the initial cuts.  From there, I cut a little more to even everything out.

To create the tied look in the back, I wrapped the seam that I cut from the bottom of the t-shirt around the back.  I started my wrap by sewing a quick stick stitch to hold the beginning piece in place.  I wrapped the seam down and back up and then stitched the end.

At this point the shirt was a little too long and awkward looking.  I decided that I wanted it to be shorter on the sides, longer on the front and longest in the back (with a rounded pattern).  To do this, I put the shirt on and pinned the height for the front and sides (you could also pin the back, but I didn't).  I folded the shirt in half (like shown below) and cut the front piece and the back piece in a rounded pattern (folding it in half this way will cause the 2 sides of the front to match and the two sides of the back to match so that the shirt doesn't look uneven).

Fold this way to cut the bottom of the shirt.
And it's done!  I'm thinking about sewing in a few places for reinforcement, but first, I'm going to wear it to the gym!


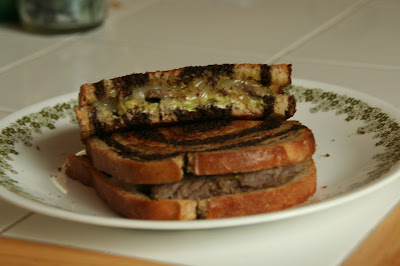
Steak and Avocado Grilled Cheese

Steak and Avocado Grilled Cheese

I really like sandwiches and have recently been into creating modified grilled cheese sandwiches.  A while back I found this Green Goddess Grilled Cheese Sandwich on Pinterest.  I tried it, but it had a little too much avocado and goat cheese for me (relative to other ingredients) so I decided to add meat to balance it out (this is great for using a little meat leftover from a previous meal).  I have tried chicken and steak and several types of bread and have liked it every time!

Ingredients:
Steak (cut into strips - I buy it in strips)
Garlic Powder
Onion Powder
Meat Tenderizer
Avocado (thinly sliced)
Cheese (I prefer Montery Jack with Jalapenos)
Goat Cheese
Pesto
Spinach
Olive Oil
Butter
Bread

Cook the seasoned steak in olive oil (season to your liking).  Time will depend on how you like your steak cooked - I like mine rare so cooking time is short.  If you're using leftover meat, you can skip this step.

On one slice of bread lightly spread goat cheese (too much goat cheese makes me gag - I guess if you REALLY like it, you could heavily spread the goat cheese).  On the other slice of bread, lightly spread the pesto.   Place thinly sliced cheese on top of the pesto (to me it needs to be separated from the goat cheese).  Put spinach on top of the goat cheese, then avocado slices and meat.  Put the sandwich together.

Melt butter in a pan over low-medium heat.  Then place the sandwich in the pan (I like to flip mine fast to get butter on both sides).  Cook until both sides are browned and the cheese is melted (if the sandwich is browned but the cheese isn't melted, turn the heat down).

Enjoy!